 Deutschland - English
- Country
-
 Deutschland
-
 UK
UK
- Language
- Deutsch
- English

- Language
- English
- Language
- English
- Language
- English
 Deutschland - English
 Deutschland
 UK
UK 
Requirements for One Net Business applications
Information for administrators
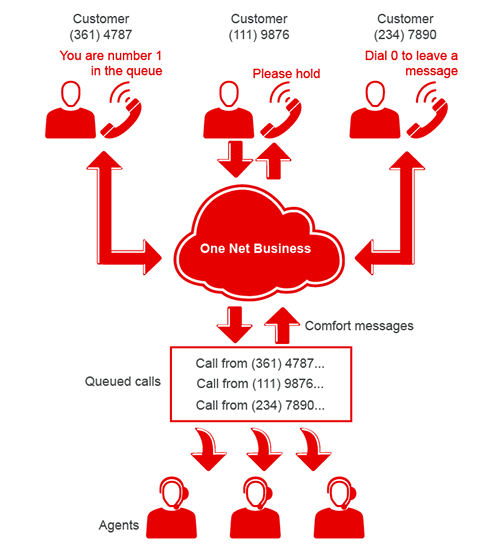
In One Net Business, a call centre is a queue that administrators create in One Net Manager. Your organisation might, for example, have a queue for sales calls and a queue for technical support calls. A call centre has one or more phone numbers that customers can call. When customers call one of these numbers, their call is placed in the queue. Calls are presented to agents in the order in which they arrived.
Read more about virtual users >

To create a new call centre you add a new user in One Net Manager.

When you add a new user to your site, you specify the services they need and their phone number.
The user is created in a 'Pending' state, which means they can make but not receive calls. When Vodafone has activated the user, it changes the state to 'Activated' and the user can receive calls. If the user can't be activated, their state shows as 'Failed'. Contact the One Net Business team for advice.
You can't delete a user or modify their configuration settings until they are active.
To add a user
For administrators only
Choose the Call Center - Basic or the Call Center - Standard.
Typically for a call centre you should select Voice Messaging User (Unlimited), Redirection number and all the call forwarding options.
Call distribution policies determine how incoming calls are presented to agents.
Read more about call distribution policies >

For administrators only
There is a risk of misreporting dropped calls when using the simultaneous call distribution policy.
You select agents for your call centre from the Agents box.

For administrators only
You can search for a specific agent by name.
The order in this list determines the ringing order for regular and circular call distribution policies.
You select supervisors for your call centre from the Supervisors box.
If you decide to promote an agent to supervisor, make sure you remove them from the Assigned list before you add them to the Assigned Supervisors list.

For administrators only
You can search for a specific supervisor by name.
The order in this list determines the ringing order for escalated and emergency calls.
Announcements include comfort messages. Comfort messages are announcements that customers hear while their call is queued. Messages might include the position in the queue and approximate waiting time.
You set up announcements and music on the Announcements tab of the Profile tab. Return to the top of the page to see this.
You can choose to upload your own custom announcements.
See a list of compatible file formats for announcements >

For administrators only
For administrators only
You set up call routing policies on the Call Centre routing policies tab.
Choose what you want to happen to bounced, stranded and overflow calls. You can also choose whether to bypass the comfort message for calls waiting less than your specified time interval.
The call routing policies you see in One Net Manager depend on the edition you have.
Did you find this article useful?
Yes
No
Thanks for your feedback.